Feeds:
Posts
Comments

Hello to all of my faithful followers!

I have moved my blog over to it’s very own domain! I would love for you all to click on the following link and subscribe to that page to continue to follow me on my culinary adventure.

www.pureandyummy.com

Today I posted some yummy St. Patty’s Day pancakes and I am madly working on something yummy to share with you all tomorrow.

I look forward to sharing all my new recipes with you at www.pureandyummy.com

Thank you for following me!

Carrie

Cheddar Ale Soup

All I know is that I am TIRED of the cold weather. I know, I know I don’t really have a right to complain since I live in Orange County, California, but I am complaining anyway! I grew up in Northwestern Montana, so I have had my fair share of snowy cold winters and I moved here to escape that. And because I grew up in the snow, I usually don’t mind the small cold streaks that we get here in the OC, but this year I am over it! I am also sick and tired of being sick. This cold and flu season has hit my family hard this year. So needless to say I am ready for springtime and all the warm sunny days that it brings.

So to keep myself and my family warm I have been cooking and baking all kinds of yummy goodies. Not only does it warm our bodies, but it warms our home and fills it with lots of comforting smells too. I do love the coziness the cold weather brings. I felt soup was in order this past week and since my husband could eat cheese as a main course I choose a cheese soup. This soup tastes exactly like you would think a good Cheddar and Ale soup would taste. Williams-Sonoma has never let me down when it comes to letting flavors shine through in their recipes. The sharp cheddar cheese marries well with the bitterness of the ale. We enjoyed this soup with a warm crusty loaf of bread dipping it in the soup. I think a fun way to serve this soup would be in a bread bowl.

Cheddar Ale Soup

I hope you are staying warm wherever you are. If not, do like me and make some soup and bread and snuggle under a blanket and think of all the sunshine spring will bring very soon! Bon Appetit!

Cheddar and Ale Soup
Printer Friendly Version

½ cup unsalted butter
1 leek, white and light green part only, cleaned and thinly sliced
1 carrot, peeled and cut into ½ inch dice
1 stalk celery, cut into ½ dice
salt and freshly ground pepper to taste
½ cup all purpose flour
½ teaspoon dry mustard
4 cups chicken stock or broth
1 bottle good quality ale
2 cups sharp cheddar cheese
¼ cup freshly grated Parmesan cheese
1 pinch cayenne pepper
1 teaspoon Worcestershire sauce
2 tablespoons finely chopped fresh flat leaf (Italian) parsley

In a large saucepan over medium heat, melt the butter. Add the leek, carrot and celery and saute until softened, about 10 minutes. Season with salt and pepper.

Stir in the flour and mustard until incorporated and cook for about 1 minute. Add the stock and ale and bring to a simmer over high heat. Reduce the heat to medium and cook, whisking to break up any lumps of flour, until the mixture is slightly thickened, about 5 minutes. Add the cheeses and whisk constantly until nicely melted, 3-5 minutes longer. Do not let boil. Stir in the cayenne and Worcestershire sauce. Taste to adjust the seasoning.

Ladle the soup into bowls and garnish with the parsley and/or additional cheese and serve immediately.

Adapted From: Williams-Sonoma Soup & Stew

Red Velvet Cupcakes

Red Velvet Cupcakes

Happy Valentine’s Day everyone! 

I don’t think it would be a holiday at my house unless there were some sort of cupcake to celebrate with. Not only is it Valentine’s Day here at our house, but it is also our youngest daughter’s 1/2 birthday (I don’t normally celebrate 1/2 birthday’s but her’s falls on a fun holiday and she is 18 months old today, which is one of the most special of the 1/2 birthday’s)! 

I have had my heart set on red velvet cupcakes for quite awhile, but I wanted to wait and try them for Valentine’s Day. The color of the cake in this recipe is fantastic! Red is my favorite color and I just love how bright these cupcakes turned out. Not only do they look beautiful, but they taste amazing. The cake is moist and has a wonderful flavor that is complemented perfectly by the cream cheese frosting. This is the perfect cupcake to celebrate any holiday, but especially this Hallmark card one. It is not to late to make these for your special someone. Enjoy!

Red Velvet Cupcakes 

Red Velvet Cupcakes
Printer Friendly Version

Ingredients
1 1/2 cups of sugar
1/2 cup (1 stick) of butter, softened
2 eggs, room temperature
2 1/3 cups of cake flour
2 tablespoons of Dutch-processed cocoa powder
1 teaspoon of baking soda
1 teaspoon of baking powder
1/2 teaspoon of salt
1 cup of buttermilk*
1 1/2 tablespoons of red food coloring
1 teaspoon of vanilla extract
1 teaspoon of distilled white vinegar

Cream Cheese Frosting:
8 ounces cream cheese, softened
5 tablespoons butter, softened
2 teaspoons vanilla extract
2 1/2 cups powdered sugar

*You can make your own buttermilk by adding a tablespoon of distilled white vinegar to milk and letting it stand for about 10 minutes.

Directions:
Preheat the oven to 350°F. Beat the butter and sugar in an electric mixer for 3 minutes on medium speed until light and fluffy.

Add the eggs, one at a time, beating until each is fully incorporated. Be sure to scrape down the sides of the bowl to ensure even mixing.

In a large bowl, sift together the cake flour, cocoa powder, baking soda, baking powder, and salt. In another bowl whisk together the buttermilk, vinegar, vanilla extract, and red food coloring.

Add a fourth of the dry ingredients and mix, then add a third of the wet. Continue adding in a dry, wet, dry pattern, ending with the dry ingredients.

Scoop into cupcake papers, about 1/2 to 3/4 of the way full. Bake for 18-22 minutes or until a toothpick comes out clean. Rotate the pan after the first 15 minutes of baking to ensure even baking.

Allow to cool for one minute in the pan then transfer to a wire rack to cool completely. Makes about 2 1/2 dozen cupcakes.

Frosting Directions:
Combine the cream cheese and butter in the bowl of an electric mixer. Beat on medium-high speed until well combined and smooth, about 2-3 minutes. Mix in the vanilla extract. Gradually beat in the confectioners’ sugar until totally incorporated, increase the speed and then beat until smooth. Frost cooled cupcakes as desired.

Adapted From: Cupcakes: Simply Recipes; Frosting: Annies Eats

Valentine Heart Cookies

Valentine Heart Cookies

Valentine’s Day is one of those “holidays” that some people love and some people don’t. I have never gotten very excited over Valentine’s Day, but I always appreciated it just a teenie bit. Then I had two little girls and they love all things pink, so my appreciation for Valentine’s Day started to grow more and more each year. This year I have been very excited to try some new sweets and embrace the fun and yummy side of the day. I have always loved the way that sugar cookies look when they are decorated all fancy with royal icing. This past December I used royal icing for the first time and had a blast learning to work with it. I knew right away that I would be making all kinds of fun cookies in the year ahead as there are endless possibilities of fun and creative cookies that you can produce using royal icing. I definitely need to work on my piping skills and I learned a great deal from making this batch of cookies. I found that using a #2 tip when piping makes things so much easier (I wish I would have realized it sooner, like when I was piping the edges, oh well, it worked out). I also loved using the plastic decorating bottles for flooding the cookies, it made things go so much smoother and with little to no mess!

Valentine Heart Cookies

I had a lot of fun piping fun sayings and little hearts onto the pretty pink cookies.

Valentine Heart Cookies

Katelyn even got to help decorate a bunch of little hearts with lots of Valentine sprinkles.

I choose to use Martha Stewart’s sugar cookie recipe and I think they turned out perfect. The flavor is wonderful and they are so soft and delicious, they just melt in your mouth. So if you have been wanting to try decorating with royal icing, Valentine’s Day is a perfect time for cookie experimenting. We had so much fun making these cookies and we can’t wait to share them with all of our Valentines!

Valentine Heart Cookies

Valentine Heart Cookies
Cookies: Printer Friendly Version
Royal Icing: Printer Friendly Version

Sugar Cookies
Makes 2 dozen

2 cups all-purpose flour
1/4 teaspoon salt
1/2 teaspoon baking powder
1/2 cup (1 stick) unsalted butter
1 cup sugar
1 large egg, lightly beaten
2 tablespoons milk
1/2 teaspoon pure vanilla extract

Directions
Whisk together flour, salt, and baking powder in a medium bowl; set aside. In the bowl of an electric mixer fitted with the paddle attachment, cream butter and sugar; mix until light and fluffy. With mixer running, add egg, milk, and vanilla; mix until well combined. With the mixer on low, slowly add reserved flour mixture. Mix until just combined.

Transfer dough to a work surface. Shape into 2 discs, cover with plastic wrap, and refrigerate for at least 1 hour.

Preheat oven to 350 degrees. Line baking sheets with nonstick baking mats or parchment paper; set aside.

On a lightly floured work surface, roll out dough to 1/8-inch thickness. Cut into desired shapes, and transfer to prepared baking sheets, leaving an inch in between. Leftover dough can be rolled and cut once more. Bake until lightly golden, about 10 minutes; do not allow to brown. Transfer to wire racks to cool.

Decorate with Royal Icing (click here for recipe).

Adapted From: Martha Stewart

Country Style French Bread

It has been rainy and cold here in Southern California for a little over a week, and I have to admit that it is kind of nice. I grew up in Montana so I really enjoy the crisp cool air and the excuse to wear warm snuggly clothes and cuddle under blankets. Now I am not saying that I am ready to ditch the sunny California weather for the snowy Montana roads, but it is nice to have the occasional cool days.

When we have these cool days it really makes me want to turn on my oven and bake some yummy goodies. This time I decided to go with crusty bread. Since I started working with yeast last summer, I have been excited to try so many different recipes. Working with yeast is so much fun and so far the end results have been out of this world fantastic. I found this recipe on the King Arthur website and was drooling as I read through the steps. This bread has a wonderful crusty exterior with the perfect soft fluffy inside you would expect from a French bread and the flavor was perfect. My favorite way to eat any crusty bread is fresh out of the oven, sliced and dipped in olive oil and vinegar. And the first night, that is how we ate it. However, the next day for lunch, my husband and I sliced thin slices and made grilled cheese sandwiches with some sharp and medium cheddar cheese. They were outstanding grilled cheese sandwiches, and my husband even said he thought they were the best grilled cheese he has ever had. I will definitely be making this recipe again!

Country Style French Bread

French-Style Country Bread
Printer Friendly Version

Sponge Starter (Begin 2 to 16 hours ahead)
1 cup (8 ounces) cool to lukewarm water, preferably spring water (90 to 100°F)
1/2 teaspoon active dry or instant yeast
1 1/4 cups (5 1/4 ounces) King Arthur Unbleached Bread Flour
1/4 cup (1 ounce) King Arthur White Whole Wheat or Traditional Whole Wheat Flour

Dough
All of the sponge starter (above)
1 cup (8 ounces) lukewarm water, preferably spring water (100 to 115°F)
3/4 teaspoon active dry or 1/2 teaspoon instant yeast
1 tablespoon sugar
3 3/4 to 4 cups (1 pound to 1 pound 1 ounce) King Arthur Unbleached Bread Flour
1 to 1 1/2 teaspoons salt

To Make The Sponge: Stir all of the sponge ingredients together to make a thick, pudding-like mixture. Cover with plastic wrap and leave on a counter overnight or for at least 2 to 4 hours. If you’re making this in a bread machine, place the sponge ingredients inside, and turn the machine on for just a few seconds to mix the ingredients together. Turn the machine off and close the cover. Let the sponge rest for 4 hours or overnight (anywhere between 2 and 16 hours is fine, the longer the better).

To Make The Dough: Stir down the sponge with a spoon and add the water, yeast, sugar, most of the flour (hold back about 1/2 cup to use if required), and salt. Knead the dough, adding more flour as necessary, to make a soft dough, 10 to 12 minutes.

Note: You may also do this in your bread machine, using the Dough or Manual setting. After the dough has finished kneading, place it in a lightly greased bowl, and continue as directed below.

Big Tip: Mix ingredients together using up to 80% of the flour called for: it will be a loose, messy mass. Let the dough rest for 12 minutes, and you’ll see it change in texture, to be come much smoother. Continue, kneading and adding additional flour as required. Overall, the dough handles better once its had time for the flour to absorb the water while resting and relaxing. By using this method, you’ll tend to add less flour, and have much bigger holes in your finished bread.

Place the dough in a lightly greased bowl or plastic container, cover with lightly greased plastic wrap and a damp towel, and let it rise until almost doubled (depending on the weather, this could be l to 2 hours). If you’re going out, or if you prefer, let the dough rise slowly in the fridge. If your dough has been refrigerated, allow it to come to room temperature; it’ll warm up and rise at the same time. After its first rise, deflate the dough gently, but don’t knock out all the air; this will create those “holes” so important to French bread. Form the dough into a round ball. Place two cookie sheets atop one another, and place a semolina- or cornmeal-dusted piece of parchment paper on top. Gently place the ball of dough on the cookie sheets, seam-side down. Cover it lightly with a tea towel, and let it rise the second time until it’s puffy and about 40% to 50% larger, anywhere from 45 to 90 minutes (depending on the weather, luck, and magic). Slash or cross-hatch the bread with a sharp knife or lame. Dust it with a little flour.

Preheat your grill to High. Place the bread (on the doubled-up cookie sheets) on the grill, and close the cover. Immediately reduce the heat to Medium (400°F), and allow the bread to bake for 25 minutes, or until it’s well-browned. Reduce the heat to Low, and carefully place the bread directly on the grill. Continue to bake until completely done, about 5 minutes.

For Regular (Oven) Baking: Preheat the oven to 475°F. Slash the bread, spritz water into the oven with a clean plant mister, and place the bread in the oven. Reduce the heat to 425°F and spritz with water every few minutes for the first 15 minutes of baking. Bake the bread for about 25 to 30 minutes, or until it tests done. Yield: 1 large round bread or two medium breads, 10 to 12 servings.

Adapted From: King Arthur

Guacamole

Guacamole

With a very big game coming up this weekend and lots of people getting together to eat tons of snacks and root on their favorite team, I thought it would be a good time to share with you one of my all time favorite snacks.

Shhhh, don’t tell…this recipe is super easy! 

This is one of the things that I get asked very often to bring to gatherings. When I was still working, my work friends would practically beg me to bring this in. I even had people bring me the avacados so I could make the dip for everyone. We make this very often to just snack on in our house and it makes an apperance at many family gatherings throughout the year.  My kids both love this so much and I fed it to them both as babies as a snack and they would eat a whole ‘little’ bowl right off the spoon!

I also saw that Whole Foods has organic avacados on sale today, for one day only! So run on out and get some and make this delicious snack for your game day gatherings, or just cause you want a yummy treat!

Guacamole
Printer Friendly Version

2 ripe avacados
1/4 teaspoon salt or to taste
1/8 teaspoon freshly ground black pepper or to taste
1/2 teaspoon garlic powder
1 heaping tablespoon fresh salsa, home made or the kind you find in the cooler section or your grocery store (I use Rojo’s brand Fresh Cut medium salsa)

Slice avacados open and remove the pit. Scoop out the flesh of the avacado into a small mixing bowl and slightly mash with a fork. Add the salt, pepper, garlic powder and fresh salsa and stir. Add more salt, pepper and garlic powder to fit your taste. Serve with tortilla chips. Enjoy!

This recipe can easily be doubled or tripled for parties.

Lemon Bars with Oatmeal Crust

I never used to be a big fan of lemon bars, or many citrus desserts for that matter. But like many people, my tastes have sure changed and expanded over the years. Now I find something simple and refreshing about the flavors in a citrus dessert. After seeing the lemon bar recipe a couple of weeks ago from The Enchanted Cook, it reminded me that I had a recipe that I had been wanting to try since last year (I also plan on trying Veronica’s recipe soon also). The thing that I loved about this recipe was the addition of the oatmeal to the crust. The oatmeal adds a wonderful chewy texture to the buttery cookie crust.

I choose not to use the original recipe I had that called for the addition of the oatmeal to the crust because the lemon curd part of the dessert was made with a whole can of sweetened condensed milk. So in an effort to avoid that ingredient I found a different recipe and just added the oatmeal to the crust. So, if you already have a favorite lemon bar recipe, you could simply add oatmeal to the cookie crust and see what you think!

These bars are so tangy and refreshing. They are the perfect treat to give you a little glimpse of springtime.

Lemon Bars with Oatmeal Crust

Lemon Bars with Oatmeal Crust
Printer Friendly Version

Cookie Crust
2 cups all-purpose flour
1 cup oatmeal (not instant)
½ cup powdered sugar
1 cup of unsalted butter, softened
1 teaspoon vanilla extract

Lemon Filling
2 cups sugar
2 tablespoons cornstarch
5 large eggs, lightly beaten
1 tablespoon grated lemon rind
¼ cup plus 2 tablespoons lemon juice
2 tablespoons butter, melted
2 to 4 tablespoons powdered sugar

Preheat oven to 350 degrees. Grease a 9×13 inch baking dish.
Combine first 5 ingredients; beat at medium speed until well blended. Pat mixture into the prepared 9×13 inch baking dish. Bake for 18 minutes or until golden brown.
Combine 2 cups sugar and cornstarch. Add eggs and next 3 ingredients; beat well. Pour mixture over the warm crust.
Return the dish to the oven and bake at 350 degrees for 20-25 minutes or until set. Cool Completely then put in the refrigerator to chill completely. Sift the 2-4 tablespoons of powdered sugar on top before serving.

Adapted From: Southern Living Incredible Cookies plus the addition of oatmeal to the crust


Hello to all my loyal followers and friends! Pure & Yummy now has pages on both Facebook and Twitter. This is just another way for all of you to keep in touch with what is going on here at Pure & Yummy. I would love for you to click the links that are located on the right side of the blog and follow along with me there. I am working on some yummy food and plan to have more recipes up very soon. Hope you are all having a wonderful week wherever in the world you are. Happy cooking, baking and especially, Happy Eating to you all!

 Mini Key Lime Cheesecakes

Tuesday was my birthday and I wanted to make something yummy for my birthday. That is right, I am made my own birthday dessert (I know that my fellow food bloggers will understand this quite well). Now my first thought (of course) was to make a super fun cupcake that I hadn’t tried yet, but then I remembered these delicious mini cheesecakes that I made this past fall, and I knew that was what I wanted. The ones I made in the fall were raspberry, but for some reason I have been on a lime kick lately, so I came up with the idea of a key lime flavored cheesecake. I knew that someone somewhere had created one already and I was right. I found a recipe at Smitten Kitchen and low and behold she even made them mini like I was looking for! In her blog I also noticed she had a neat mini cheesecake pan. I had never seen one of these before and was immediately fascinated so I hopped on my favorite gadget buying site, eBay, and found one for a good deal! This pan is adorable, that is if a pan can be adorable, and it makes adorable little bite sized desserts. How perfect is that? I digress…on to the recipe.

Mini Cheesecake Pan

The original recipe from Gormet, May 2002 was made for a full cheesecake and our friends over at Smitten Kitchen used half the recipe to make 12 mini cheesecakes. The recipe that I show below has been reduced and will yield 12 mini cheesecakes (with a little bit extra), that is why some of the measurements are a little odd. The original recipe also called for lime soaked mangoes to garnish the tops of the cakes, however I am not a big fan of mango so  I decided to go with coconut. After reading the Smitten Kitchen blog she put the “lime in the coconut” song in my head and I couldn’t get it out. I even played the song and sang it a lot while I was baking these. That song is addicting! I also used cinnamon gram crackers in the crust as this is my favorite way to make a cheesecake crust (my super fabulous cousin Hallie gave me the idea).

Mini Key Lime Cheesecakes

These cheesecakes were fantastic! They were exactly what I had imagined a key lime flavored cheesecake would taste like. They have the perfect tangy lime flavor and the cheesecake is soft and smooth. I loved these so much I think next time I will make the whole big cheesecake! 🙂

Mini Key Lime Cheesecakes
Printer Friendly Version

For crust
3/4 cups fine cinnamon graham cracker crumbs
2 tablespoons unsalted butter, melted

For filling
1 (8 ounce) packages cream cheese at room temperature
1/2 cup plus 1 tablespoons sugar
1/4 cup plus 2 tablespoons fresh key lime juice (strained from about 1 1/2 lb Key limes) or bottled if you can find it
1/4 cup sour cream
1/4 teaspoon vanilla
1 tablespoons plus 1 teaspoon all-purpose flour
1/8 teaspoon salt
1 large egg and 1 egg yolk

For topping
1/2 cup chilled heavy cream
1 tablespoon sugar
1/2 cup shredded coconut

Make crust: Preheat oven to 350°F. This recipe can be made in a mini cheesecake pan or in a muffin pan with or without papers.

Stir together crumbs and butter in a bowl with a fork until combined well, divide the crumb mixture into the 12 holes of your mini cheesecake pan (or muffin cups) then press evenly onto bottom of each hole of the pan. Bake crust in middle of oven for 4-5 minutes and cool in pan on a rack.

Make filling: Reduce oven temperature to 325°F.

Beat cream cheese with an electric mixer at medium speed until fluffy, then beat in sugar. Add lime juice, sour cream, and vanilla and beat until smooth. Mix in flour and salt at low speed, scraping down side as needed, until just incorporated, then add eggs all at once and mix just until incorporated.

Pour filling onto the crusts in each hole of the pan. Bake cakes in the middle of the oven until set in center, about 25-30 minutes (be sure to watch your mini cheesecakes as they can over cook very since they are small). Cool completely in pan on a rack. (Cake will continue to set as it cools.)

Run a thin knife around edge of each cake and push up to remove from the pan.

Make topping: Place the shredded coconut in a saute pan and heat over medium heat on the stove until lightly toasted (it is important that you watch it closely as it can burn very quickly).
Beat cream with sugar in a bowl with electric mixer until it just holds stiff peaks, then spread or pipe on top of each cheesecake. Then place the toasted coconut on top of the whipped cream and enjoy your bite sized treat!

Adapted from: Smitten Kitchen

Orange Sherbet

 Orange Sherbet

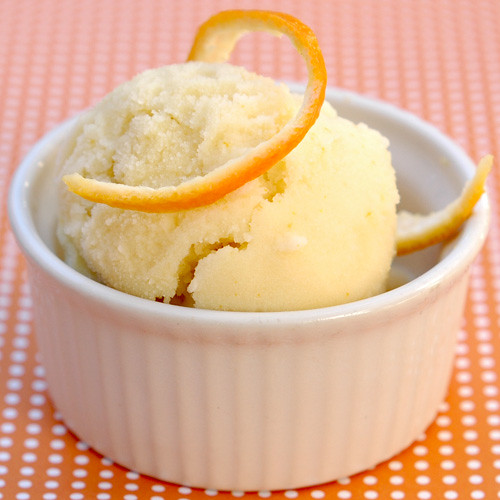
Well, here is the first delicious thing I made with my surplus of citrus from this past weekend. I know for most of you it is snowy and cold, but for us here in Southern California it has been very sunny and warm this past week. We have been having summer-like weather and there is nothing better on a warm summer day then a refreshing bowl of ice cream. With all the fresh oranges from my neighbor’s tree and the warm weather, I immediately thought of my favorite childhood summer treat…orange sherbert. My grandparents would always have those fun 50/50 cups with the wooden spoons when we would go and visit them in the summers and my brothers, cousins and I loved to sit in their big back yard and enjoy the warm summer air and our tasty dessert. This recipe is fantastic and with the first bite I smiled and felt like I was that little girl again in my grandparents back yard. It was a big hit with the rest of the family too. I can already predict that I will be making this recipe often this summer and I definitely plan to make my own 50/50 version too!

Orange Sherbet
Printer Friendly Version

Ingredients
7 ounces sugar (3/4 cup plus 2 tablespoons)
1 1/2 tablespoons finely grated orange zest
1/4 teaspoon salt
2 cups freshly squeezed orange juice, approximately 2 to 3 pounds oranges
1 tablespoon freshly squeezed lemon juice
1 teaspoon vanilla extract
1 1/2 cups very cold whole milk

Directions
In the bowl of a food processor combine all of the ingredients except the milk and process until the sugar is dissolved, approximately 1 minute. Transfer the mixture to a mixing bowl and whisk in the milk. Cover the bowl and place in the refrigerator until the mixture reaches 40 degrees F or below, approximately 1 hour.
Pour the mixture into an ice cream maker and process until it is the consistency of soft serve ice cream. You may serve now or transfer to a lidded container and place in freezer until firm, approximately 3 hours.

Adapted From: Alton Brown